
How to use the Website builder to create your online store #
The Little Big Shop drag-and-drop Website builder is a tool that allows you to create a unique and professional website for your online store with no tech or design skills.
In this help article, we explain the Website builder’s features and how they can be used to bring your brand to life, promote your products, tell your story and much more.
Quick breakdown #
The Website builder contains many features, but the following are frequently mentioned and are a good starting point to familiarise yourself with.
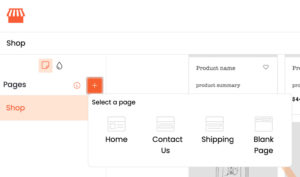
- Pages: Every Little Big Shop comes with a default shop page, but there is an option to add other pages with pre-built templates: Home, Shipping, Contact Us and a blank page (often used for an ‘About’ page).
- Global styles: Add your logos and update your branding site-wide, helping you achieve a consistent look. We’ll mention global styles here, but our help page Global styles goes into greater detail.
- Section templates: A section template is a blank or pre-built template with editable elements that are like building blocks for your pages and contain ideas on how to present your content. In most cases, you can click on an element, e.g., text, and change it to your liking. The header and footer section templates are default and cannot be removed.
Step-by-step guide #
To access the Website builder:
- From the Admin dashboard, select ‘Website builder’ on the left-hand side
- A new tab will open with the Website builder
Your default Shop page #
Upon opening the Website Builder for the first time, you will land on the default ‘Shop’ page. On the top left-hand side, you will see the Pages icon is already selected, and next to it is the Global styles icon.
As you add products to your shop from the ‘Products’ section in the Admin dashboard, they will appear in your live online store. This page can be your shop and website, but as mentioned previously, you can use the website builder to add any of the following pages to give it a website feel:
- Home
- Contact Us
- Shipping
- Blank Page
We’ll start with exploring the Shop page.
The Shop page template #
This contains the following elements:
Default header: this is your site’s navigation and if you add extra pages to your store (more on how to do that soon) they will appear here. You cannot delete your shop’s header.
Update your logo
-
- Option 1: click on the LOGO image and select the pencil icon. Follow the prompts to change the logo
- Option 2: select ‘Global styles’ > ‘Logos’ > click on the box in ‘Site logo’ to add your logo site wide > click ‘Save’ to apply your changes
Change your background colour
-
- Select the header > ‘Style manager’ will appear on the top right > select ‘Decorations’ > click into the field underneath ‘Background colour’ and add your own hex code or use the drag function to select your own colour
Base panel
There is a base panel under the header and above the footer. This contains instructions to ‘Drag section template here’. It is optional to add content here. You may want to use this space to advertise a promotion or new stock.
Add section templates
To drag a section template to the base panel:
- Navigate to the top right-hand side of the website builder and select the ‘Add section templates’ icon (it looks like a rectangle)
- Click on ‘Blank Templates’ or ‘Prebuilt Templates’ to view and explore options to choose from
- Click on a section template to select it and drag it above the base panel. When the green line guide appears, drop the section template here then click into it to start making your changes
- You can add as many section templates s as you like!
Shop placeholder image
This placeholder demonstrates how your products will display in your store once you start adding them. It does not appear in your live store.
Footer
The footer is a mandatory template and you can simply click into it to update it.
If you would like to choose another footer design:
- Select ‘Add section template’ and navigate to the ‘Footer’ section to explore your options.
- Hover over your chosen footer and click to select the footer.
- The new footer will automatically be applied. Simply click into it to to start editing it!
Add other pages #
To add a Home, Shipping, Contact Us and/or a Blank page to your store:
- From the left-hand side, navigate to ‘Pages’ and select the plus icon to the right
- Click on the icon of the page you wish to add and it will begin to load
- Click ‘Save draft’ on the top right side of the website builder to save your edits, or click ‘Publish’ to instantly publish the page
If you’re stuck on ideas, each page template are like a guide for what content to add.
Using the Style manager and Element tools #
These tools give you greater flexibility for your website design:
Style manager: edit the typography, dimension or decorations (background image or colour) of a section template
Elements: add and edit other elements to a section template, like an image or primary button
Style manager #
To access this:
- Add your section template to the page you are working on
- Navigate to the top right of the website builder and select the pencil icon (it will say ‘Edit’ when you hover over it)
- Underneath the heading ‘Style Manager’ you will see:
- Typography: lets you edit your font
- Dimension: allows you to increase or decrease the height and width of elements within a section template, as well as the padding for the overall template
- Decoration: Add a background image to a section template or change the background colour
Elements #
To access this:
- Add your section template to the page you are working on
- Navigate to the top right of the website builder and select the plus icon (it will say ‘Add elements’ when you hover over it)
- Underneath the heading ‘Add elements’, you will have a selection of elements to choose from
- Click on an element and drag it to the section templates, releasing when you wish to place it
- Click into the element to edit it.
- The styles you set in Global styles will apply to these elements.
Customise code #
If you’re an experienced coder, you can edit the HTML of a section template to achieve your desired look. Simply select the ‘Show code’ icon on the far right, click into the HTML box, make your changes and click ‘Apply’ to add these changes.
Saving drafts and publishing immediately #
To save a draft and return to it later, click the ‘Save draft’ button on the top right-hand side of the Website builder.
To publish your changes, click the ‘Publish’ button next to the ‘Save draft’ button.
Click on the last icon ‘Version history’ to review any of your previous drafts or versions of your published pages.
Tips #
- Always preview your changes on your desktop and mobile to make sure everything looks perfect before publishing
Start building your perfect online store with Little Big Shop’s easy-to-use website builder. #
Check out our page about our website builder to learn more about its capabilities.


